Seeing a program you wrote running directly on the bare metal is deeply satisfying to anyone who enjoys writing software. And it turns out that creating such a program from scratch is easier than it sounds. The hardest part is figuring out where to start. In this tutorial, I'll show you how to write, build and run the classic "Hello, World!" in pure assembly.
"Hello, World!" inside the UEFI shell. You could also boot directly into the application.
Well, almost – on a modern computer, our assembly application doesn't just have direct access to the hardware. Instead it must communicate with an intermediary firmware layer on the motherboard, through the so-called Unified Extensible Firmware Interface (UEFI).
Creating a "Hello, World!" UEFI application is a three-step process:
Set up a virtual machine with UEFI support.
Install an assembler that can output UEFI applications.
Write the actual program and run it!
Setting up QEMU
We could test our application by repeatedly copying it to a USB drive, rebooting our computer and then seeing if it works. Obviously, we don't want to do that. Instead, we'll be testing our application inside a virtual machine, and QEMU is a great fit for this purpose.
Step 1 — Install QEMU
If you are using a GNU/Linux distribution, there's a good chance that it has a qemu package available. I'll assume that you're using Ubuntu, but you can easily adapt these instructions to whichever system you're using.
$ sudo apt-get install qemu
Once the intallation finishes, you should have qemu-system-x86_64 availabe in your path:
$ qemu-system-x86_64 --version
QEMU emulator version 2.11.1(Debian 1:2.11+dfsg-1ubuntu7.23)
Copyright (c) 2003-2017 Fabrice Bellard and the QEMU Project developers
While most modern computers come with UEFI-support built-in, QEMU does not. Instead, we will use something called OVMF, which is a firmware layer that adds UEFI support to QEMU.
Step 2 — Set up OVMF
Again, there is probably a package available for your distribution. If you are using Ubuntu, run:
$ sudo apt-get install ovmf
This should install the file OVMF.fd somewhere on your system. Figure out where:
Then, go ahead and copy this file to your working directory:
$ cp /usr/share/ovmf/OVMF.fd .
(On some GNU/Linux distributions, the relevant package may install both a 32-bit and a 64-bit version; in this case, use the 64-bit version.)
The UEFI firmware provides a bare-bones environment called the UEFI shell. We'll want to test the application that we build from this shell. Let's check that it's working correctly.
Step 3 — Try the UEFI shell
You should have the file OVMF.fd available in your working directory from step 2. To tell QEMU about this firmware, use the argument -bios OVMF.fd. We also need to specify -net none so QEMU won't try to boot over the network:
$ qemu-system-x86_64 -bios OVMF.fd -net none
This will land you in a shell that looks a little something like this:
UEFI Interactive Shell v2.2
EDK II
UEFI v2.70 (EDK II, 0x00010000)
Mapping table
     BLK0: Alias(s):
          PciRoot(0x0)/Pci(0x1,0x1)/Ata(0x0)
Press ESC in 1 seconds to skip startup.nsh or any other key to continue.
Shell>
Try typing help -b to get a list of commands.
We need some way of accessing the executable that we build from inside the UEFI shell. The shell can read FAT32 file systems. Conveniently, QEMU can mount a directory in the host file system as a FAT32 formatted drive in the virtual machine.
Step 4 — Open files from the UEFI shell
We'll store the files on our emulated drive in a directory on the host called drive/. For now, let's just create a small test file that we'll try to read:
$ mkdir drive
$ echo "This is a test" > drive/test.txt
To make this directory available as a FAT32 formatted drive inside QEMU, use the -drive option like this:
Inside QEMU, you will now see that there is a new file system available called FS0:. Switch to it and look for the text file that you just created:
Shell> fs0:
FS0:\> dir
Directory of: FS0:\
03/21/2020  17:46                  15  test.txt
03/21/2020  16:49              10,565  NvVars
          2 File(s)      10,580 bytes
          0 Dir(s)
FS0:\> cat test.txt
This is a test
Great! We can now transfer our executable into QEMU and open it from the shell. This gives us an environment that is very similar to what we would get if we inserted a FAT32 formatted USB drive into a real computer with a UEFI shell installed.
Assembling a UEFI application with FASM
It would be nice if we could just put a bunch of machine code on a USB drive and have our computer execute that. Unfortunately, that's not how it works. All modern operating systems store executables as object files. An object file contains both the machine code itself and some information about how that code should be loaded and executed.
The specific object file format used by UEFI is the so-called Portable Executable format. This format is also used by Microsoft Windows for .exe and .dll files.
An assembler is a program that generates an object file from assembly code. There are many assemblers, but for this tutorial we'll be using FASM, because it's easy to use and has built-in support for the object file format we need.
Step 5 — Install FASM
On Ubuntu, FASM is available in the standard repository:
$ sudo apt-get install fasm
Check that you have FASM installed and in your path:
$ fasm
flat assembler  version 1.73.13
usage: fasm  [output]
optional settings:
 -m <limit>         set the limit in kilobytes for the available memory
 -p <limit>         set the maximum allowed number of passes
 -d <name>=<value>  define symbolic variable
 -s <file>          dump symbolic information for debugging
FASM can generate code for many different output formats. We need to tell it to generate a 64-bit Portable Executable with some extra flags set to specify that it's a UEFI application. This is done using the format directive:
format pe64 efi
Let's start by writing a program that is even simpler than "Hello, World!" – a program that does absolutely nothing. This program will start at the main: label and then immediately return to the caller:
entry main
main:
  ret
The Portable Executable format, like most executable file formats, supports multiple sections. One section contains the program code, another contains data that is loaded into RAM when the program is started, and so on. The machine code should sit in a section called .text, and we should specify that data in this section may be both executed and read:
section '.text' executable readable
Thus, the final program, which does nothing and then exists, is:
format pe64 efi
entry main

section '.text' executable readable

main:
  ret
Now we just need to assemble this program, and then we'll be able to run it inside QEMU.
Step 6 — Assemble and run an empty executable
Save the program as empty.asm:
$ cat > empty.asm
format pe64 efi
entry main

section '.text' executable readable

main:
  ret
Then, assmble it with FASM, and put the output in drive/empty
$ mkdir -p drive
$ fasm empty.asm drive/empty
Now, we can mount drive/ as a FAT32 formatted drive in QEMU. Then, we just need to run the application off the drive from inside the UEFI shell. If everything goes according to plan, you should see nothing happen:
$ qemu-system-x86_64 -bios OVMF.fd -net none -drive format=raw,file=fat:rw:drive/
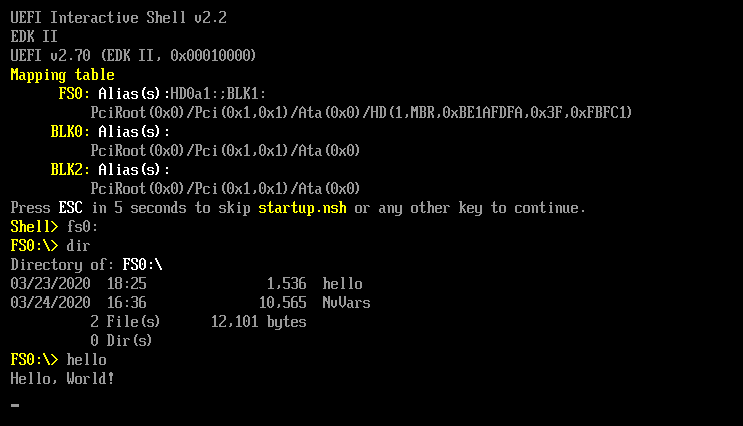
UEFI Interactive Shell v2.2
EDK II
UEFI v2.70 (EDK II, 0x00010000)
Mapping table
FS0: Alias(s):HD0a1:;BLK1:
PciRoot(0x0)/Pci(0x1,0x1)/Ata(0x0)/HD(1,MBR,0xBE1AFDFA,0x3F,0xFBFC1)
BLK0: Alias(s):
PciRoot(0x0)/Pci(0x1,0x1)/Ata(0x0)
BLK2: Alias(s):
PciRoot(0x0)/Pci(0x1,0x1)/Ata(0x0)
Press ESC in 1 seconds to skip startup.nsh or any other key to continue.
Shell> fs0:\empty
Shell>
Now that we have figured out how to assemble a UEFI application and run it inside QEMU, let's see if we can do something a little bit more interesting. Yes, it's finally time to write our "Hello, World!" program!
Using UEFI services to write output
The UEFI firmware provides some standardized services. Among them is a service that we can use to show text on the screen called the Simple Text Output Protocol. The UEFI Specification contains everything you could ever possibly want to know about UEFI – and then some. (This tutorial uses version 2.8, updated in Feburary 2020.)
For the purposes of writing "Hello, World!", we are mostly interested in the following sections:
Sections 2.3.1 and 2.3.4 (Data types and x86-64 calling conventions)
Section 4 (EFI System Table)
Section 12 (Console support)
If anything in this tutorial is unclear, you can probably find an answer to your question in one of those sections. I'll try to summarize the important parts here.
When our UEFI application is started, a pointer to the EFI System Table will be in RDX. The System Table is a structure that contains, among other things, a pointer to a Simple Text Output Protocol. This protocol is itself a structure that contains a function to print output to the screen.
The specification contains definitions of all the structures that we need to worry about. On page 92, we find:
We need to calculate the offset to ConOut inside this structure. The header is 24 bytes (see the definition on page 90), UINT32 is 4 bytes, and EFI_HANDLE and all pointer types are 8 bytes.
However, each element of the structure must also be naturally aligned (page 19). This means that 4-byte values must start at a multiple of 4 bytes, 8-byte values must start at a multiple of 8 bytes, and so on. In this case, there are 4 bytes of padding before the first EFI_HANDLE (which must be 8-byte aligned).
So, in fact, the ConOut pointer will be at index 24 + 8 + 4 + (4 + 8) + 8 + 8 = 64
Thus, we can load the Simple Text Output Protocol ConOut like so:
;; Recall that RDX contains a pointer to the System Table when
;; our application is called. So rdx + 64 is the address of the
;; pointer to ConOut, and [rdx + 64] is the pointer itself.
mov rcx, [rdx + 64]
The Simple Text Output Protocol structure looks like this (page 442):
We are interested in calling the function OutputString, which is at offset 8 inside this structure. (Each function pointer is 8 bytes.) This function takes two arguments: a pointer to the Output Protocol and the string itself (see page 444).
We can load the address of the function into RAX like so:
;; Now, RCX contains the ConOut pointer. Thus, the address of
;; the OutputString function is at rcx + 8. We'll move this
;; function into RAX:
mov rax, [rcx + 8]
FASM has a handy du instruction, which we can use to store a 16-bit string. (See the FASM manual for more information about how du works.) The string should end with a carriage return and a line feed. We'll store the string in the .data section like so:
The calling conventions (see page 27) specify that the function takes its first argument in RCX and its second argument in RDX. We must also allocate 32 bytes of so-called shadow space on the stack before calling the function. Once we have set everything up, we can call the function in RAX:
;; We already have the ConOut pointer in RCX. Let's load the
;; string pointer into RDX:
mov rdx, string
;; Set up the shadow space. We just need to reserve 32 bytes
;; on the stack, which we do by manipulating the stack pointer:
sub rsp, 32
;; Now we can call the OutputString function, whose address is
;; in the RAX register:
call rax
;; Finally, we'll clean up the shadow space and then return:
add rsp, 32
ret
And that's our "Hello, World!" program. Now we need to assemble it into an executable.
Step 7 — Assemble "Hello, World!"
Create a file with the full source code for the assembly program, and save it as hello.asm:
$ cat > hello.asm
format pe64 efi
entry main
section '.text' executable readable
main:
;; Recall that RDX contains a pointer to the System Table when
;; our application is called. So rdx + 64 is the address of the
;; pointer to ConOut, and [rdx + 64] is the pointer itself.
mov rcx, [rdx + 64]
;; Now, RCX contains the ConOut pointer. Thus, the address of
;; the OutputString function is at rcx + 8. We'll move this
;; function into RAX:
mov rax, [rcx + 8]
;; We already have the ConOut pointer in RCX. Let's load the
;; string pointer into RDX:
mov rdx, string
;; Set up the shadow space. We just need to reserve 32 bytes
;; on the stack, which we do by manipulating the stack pointer:
sub rsp, 32
;; Now we can call the OutputText function, whose address is
;; in the RAX register:
call rax
;; Finally, we'll clean up the shadow space and then return:
add rsp, 32
ret
section '.data' readable writable
string du 'Hello, World!', 0xD, 0xA, 0
Then, assemble it with FASM, and save the output in drive/hello:
$ fasm hello.asm drive/hello
With the program in the drive/ directory, we can mount this directory inside QEMU as a FAT32 formatted drive in the same way that we did before. And then we can finally run our "Hello, World!" program!
Step 8 — Run "Hello, World!" in QEMU
You should have drive/hello from the previous step. Run QEMU:
Perhaps you would like to see your "Hello, World!" program running in all its glory on your real, physical hardware. This is actually pretty easy to do. You just need to format a USB drive with a FAT32 file system, and then you can put your file directly on the USB drive. If you have a UEFI shell built-in to your firmware, then you can run the program from there.
Otherwise, you can save the file as \EFI\BOOT\BOOTx64.EFI on the USB drive; this will make the UEFI firmware think that it's a bootable device (like a USB drive with an operating system or a bootloader on it), and let you select that drive from the boot menu. If you're planning to boot directly into your "Hello, World!" program, you should change the ret instruction to jmp $. This will cause the program to wait forever so that it doesn't shut down immediately after booting from it.
Step 9 — Create a bootable USB drive
Start by replacing ret with jmp $ so you can acutally see your program running. Then reassemble it to hello:
$ sed -i 's/ret$/jmp $/' hello.asm
$ fasm hello.asm hello
I'll assume that you have an empty USB drive available as /dev/sdx. We'll need mkfs.vfat to format the USB drive. On Ubuntu, you can install this with:
$ sudo apt-get install dosfstools
Now, format the drive as FAT32:
$ sudo mkfs.vfat -F32 /dev/sdx
Then, mount the device:
$ mkdir -p mnt
$ sudo mount /dev/sdx mnt
Now, copy the hello executable to \EFI\BOOT\BOOTx64.EFI on the device:
Now you should be able to plug your USB drive into your computer and boot from it!
Of course, a "Hello, World!" program isn't all that interesting. But with this, you have a good starting point to make much more intersting applications. In fact, it's possible to make an entire operating system as a UEFI application. If this is something that sounds interesting to you, I'd recommend the OSDev Wiki as an excellent place to get started. Have fun!